声明 :本文为个人阅读《Linux 多线程服务端编程:使用
muduo C++
网络库》的读书笔记,文中部分标题可能有些更改,但主体内容和书中一致。如有侵权,告知即删。
并发编程有两种模型。运行在多台机器上的多个进程的分布式场景中,通常使用的是
message passing。在单机上也可以使用 message passing
模型作为多个进程的并发模型,更容易保证程序的正确性。
书中总结了线程同步的四项原则,按重要性排列:
最低限度地共享对象,减少需要同步的场合。共享对象优先考虑 immutable
对象。
优先使用高级的并发编程数据结构,如 TaskQueue、Producer-Consumer
Queue、CountDownLatch 等等。
迫不得已使用底层同步原语时,只使用互斥锁,慎用可重入锁,不使用信号量。
除了 atomic 整数,建议不要自行设计编写 lock-free
代码,不要使用“内核级”同步原语。不要凭空猜测不同原语性能的优异,例如
spin lock 和 mutex。
很多人误认为用锁会让程序变慢,其实真正影响性能的不是锁,而是锁争用。
2.1 互斥锁(mutex)
任何一个时刻最多只有一个线程在此 mutex
划出的临界区内活动。作者给出的使用原则有:
用 RAII 手法使用 mutex,例如 std::lock_guard。
不要使用可重入锁。
不要自行调用 lock() 和 unlock()
函数,一切交给栈上的 Guard 对象。这种做法通常成为 Scoped
Locking,能避免重复加锁、忘记解锁、多次解锁等蠢货操作。
使用 Guard 对象发生死锁时,看函数调用栈就能分析加锁的顺序。
必要时可以通过 PTHREAD_MUTEX_ERRORCHECK 来排错。
2.1.1 只使用不可重入的 mutex
在 POSIX 的叫法中,mutex
分为递归(recursive)和非递归(non-recursive)两种。当然也可以叫可重入(reentrant)和不可重入(non-reentrant)。可重入锁唯一的特点是:同一个线程可以重复对
recursive mutex 加锁。
这不是为了性能,而是为了体现良好的设计意图,可以帮助我们思考代码对锁的请求,在编码阶段发生设计问题。
书中举了一个例子,代码如下。post()
函数会加锁,traverse()
函数也会加锁。未来某天,foo.dot() 间接地调用了
post() 函数:
mutex 是不可重入的,于是死锁了。
mutex 是可重入的,foos.push_back(foo) 存在 crash
的可能。
若是不可重入 mutex,发生死锁或 crash
只需要将各个线程的调用栈打印出来分析。
1
2
3
4
5
6
7
8
9
10
11
12
13
14
std::mutex mutex; std::vector<Foo> foos; void post (const Foo& foo) std::lock_guard<std::mutex> lock (mutex) ; foos.push_back (foo); } void traverse () std::lock_guard<std::mutex> lock (mutex) ; for (auto & foo : foos) { foo.doit (); } }
如果一个函数可能在加锁的情况下调用,又可能在未加锁的情况下调用,那么就应该拆成两个函数:
一个函数跟原来函数同名,加锁之后调用第二个函数。
第二个函数加个后缀,不加锁,执行原有函数逻辑。
类似与这样:
1
2
3
4
5
6
7
8
void post (const Foo& f) std::lock_guard<std::mutex> lock (mutex) ; postWithLockHold (f); } void postWithLockHold (const Foo& f) foos.push_back (f); }
这里可能会出现两个问题:
误用了加锁版本,死锁了。将各个线程的调用栈打印出来分析即可。
误用了不加锁版本,数据损坏了。如果在 postWithLockHold
里能检测是否上锁就比较好办,像 muduo::MutexLock 提供了
isLockedByThisThread() 方法,只需要
assert(mutex.isLockedByThisThread()) 就好。
性能上,Linux 的 Pthreads mutex 采用 futex
实现,加锁解锁时不必每次都陷入系统调用。
2.1.2
死锁可能会发生意想不到的地方
有一个 Inventory 的类,记录当前的 Request
对象。它的 add 和 remove
成员函数都是线程安全的,使用了 mutex_ 保护共享数据
requests_。
1
2
3
4
5
6
7
8
9
10
11
12
13
14
15
16
17
18
19
20
21
22
23
24
class Inventory { public : void add (Request* req) std::lock_guard<std::mutex> lock (mutex) ; requests_.insert (req); } void remove (Request* req) std::lock_guard<std::mutex> lock (mutex) ; requests_.erase (req); } void printAll () const std::lock_guard<std::mutex> lock (mutex) ; for (auto req : requests_) { req->print (); } } private : mutable std::mutex mutex_; std::set<Request*> requests_; }; Inventory g_inventory;
Request 类与 Inventory
类的交互逻辑也很简单,在 process 函数中,往全局
g_inventory 中添加自己,析构时从 g_inventory
移除自己。目前看起来整个程序都很线程安全。
1
2
3
4
5
6
7
8
9
10
11
12
13
14
15
16
17
18
19
20
class Request { public : void process () __attribute__ ((noinline)) std::lock_guard<std::mutex> lock (mutex_) ; g_inventory.add (this ); } ~Request () __attribute__((noinline)) { std::lock_guard<std::mutex> lock (mutex_) ; g_inventory.remove (this ); } void print () __attribute__ ((noinline)) std::lock_guard<std::mutex> lock (mutex_) ; } private : std::mutex mutex_; };
这两个类实际上存在发生死锁的可能性,书中通过 gdb
查看两个线程的函数调用栈,发现两个线程都等在 mutex
上___lll_lock_wait,发生了死锁。
thread 用于管理 GDB 中的线程相关操作。 apply
对指定线程或所有线程执行后续的 GDB 命令。 all
表示表示命令作用于所有线程。 bt 即
backtrace,用于打印当前线程的函数调用堆栈信息。
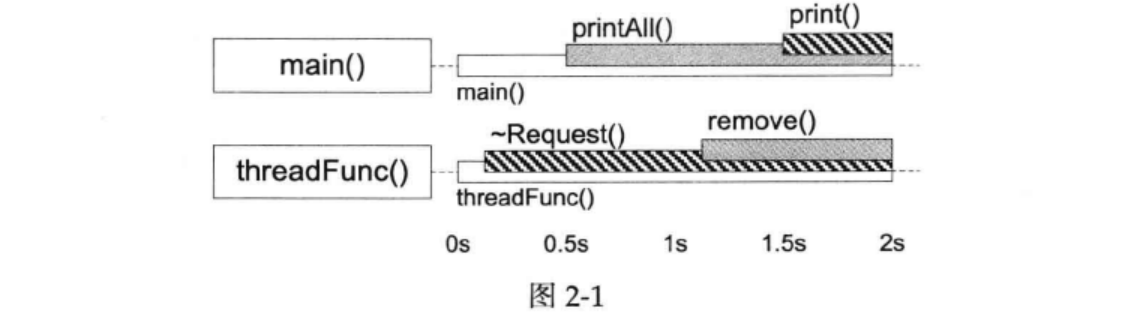
1
2
3
4
5
6
7
8
9
10
11
12
13
14
15
16
17
18
19
20
21
22
23
24
25
26
27
$ gdb ./mutual_deadlock core # gdb <可执行程序名> <崩溃时产生的 core 文件> (gdb) thread apply all bt # 打印所有线程的调用堆栈信息 Thread 1 (Thread 31229): # 这是 main() 线程 #0 __lll_lock_wait() at /opt/labs/deepunix/x86_64/lowlevellock.S:136 #1 _L_lock_953() from /lib/libpthread.so.0 #2 _pthread_mutex_lock(mutex=0xecd150) at pthread_mutex_lock.c:61 #3 muduo::MutexLock::lock(this=0xecd150) at test/Mutex.h:49 #4 muduo::MutexLockGuard(this=0xecd150) at test/Mutex.h:75 #5 Request::print(this=0xecd150) at test/MutualDeadLock.cc:51 #6 Inventory::printAll(this=0x605aa0) at test/MutualDeadLock.cc:67 #7 0x00000000000403368 in main() at test/MutualDeadLock.cc:84 Thread 2 (Thread 31230): # 这是 threadFunc() 线程 #0 __lll_lock_wait() at /opt/labs/deepunix/x86_64/lowlevellock.S:136 #1 _L_lock_953() from /lib/libpthread.so.0 #2 _pthread_mutex_lock(mutex=0x605aa0) at pthread_mutex_lock.c:61 #3 muduo::MutexLock::lock(this=0x605aa0) at test/Mutex.h:49 #4 muduo::MutexLockGuard(this=0x605aa0) at test/Mutex.h:75 #5 Inventory::remove(this=0x605aa0, req=0x80) at test/MutualDeadLock.cc:19 #6 ~Request(this=0xecd150) at test/MutualDeadLock.cc:46 #7 threadFunc() at test/MutualDeadLock.cc:76 #8 boost::function<void()>::operator()(this=0x7fff2lc10310) at /usr/include/boost/function/detail/function_template.hpp:1013 #9 muduo::Thread::runInThread(this=0x7ff21c10310) at Thread.cc:113 #10 muduo::Thread::startThread(obj=0x605aa0) at Thread.cc:105 #11 start_thread() at thread_create.c:300 #12 clone() at ../sysdeps/unix/sysv/linux/x86_64/clone.S:112
我们可以注意到 main() 线程先调用了
Inventory::printAll(#6) 再调用
Request::print(#5)。threadFunc() 线程先调用
Request::~Request(#6) 再调用
Inventory::remove(#5)。这两个调用序列对两个 mutex
的加锁顺序正好相反,造成了经典的死锁(加锁顺序不一致)。
思考 :如图,如果 printAll() 晚于
remove() 执行,还会出现死锁吗?
答案 :不会。printAll() 会等待
remove() 释放锁再执行。
思考 :Invetory::printAll →
Request::print 有没有可能与 Request::process →
Inventory::add 发生死锁?
答案 :不会。Invetory::printAll →
Request::print 时,后者 Request 还未加入到
requests_ 中,无法获取未 Inventory::add
的锁。
2.2 条件变量(Condition
Variable)
如果线程需要等待某个条件成立后再执行,我们应该使用条件变量(Condition
Variable)。对于 wait 端:
必须与 mutex 一起使用,等待条件的布尔表达式的读写也要被 mutex
保护。
在 mutex 上锁的时候才能调用 wait()。
要警惕 spurious wakeup。要么把 wait() 放到
while 循环中,要么将判断布尔表达式 lambda 函数传入
wait() 第二个参数。
1
2
3
4
5
6
7
8
9
10
11
12
13
14
15
16
17
18
19
20
21
22
std::mutex mutex; std::condition_variable cv; std::deque<int > queue; int dequeue () std::unique_lock<std::mutex> lock (mutex) ; while (queue.empty ()) { cv.wait (lock); } cv.wait (lock, [&] { return !queue.empty (); }); assert (!queue.empty ()); int top = queue.front (); queue.pop_front (); return top; }
对于 signal/broadcast 端:
不需要理会 mutex 的上锁状态就可以调用 signal。
在 signal 之前要修改布尔表达式。
修改布尔表达式通常要用 mutex 保护。
区分 signal 和 broadcast。(signal 通常用于表示资源可用,broadcast
通常表明状态变化)
1
2
3
4
5
void enqueue (int x) std::unique_lock<std::mutex> lock (mutex) ; queue.push_back (x); cv.notify_one (); }
思考 :enqueue() 中每次添加元素都会调用
notify(),如果改成只在 queue.size() 从
0 变 1 的时候才调用
notify(),会出现什么后果?
答案 :若多个 dequeue()
都在等待队列非空,此时有多个 enqueue()
连续调用,只会调用一次
notify(),唤醒了其中一个线程,而其他线程将会等不到下一个
notify(),将一直阻塞下去。
条件变量是非常底层的同步原语,很少直接使用。一般都是用来实现高层的同步措施。下面举一个
CountDownLatch 的例子,类似 Go 中的
WaitGroup。它主要有两种用途:
主线程等待多个子线程完成初始化。
多个子线程等待主线程发出“起跑”命令。
代码使用条件变量实现也非常清晰明了:
1
2
3
4
5
6
7
8
9
10
11
12
13
14
15
16
17
18
19
20
21
22
23
24
class CountDownLatch { public : explicit CountDownLatch (int count) : count_(count) { void wait () std::unique_lock<std::mutex> lock (mutex_) ; cv_.wait (lock, [this ] { return count_ == 0 ; }); } void countDown () std::lock_guard<std::mutex> lock (mutex_) ; --count_; if (count_ == 0 ) { cv_.notify_all (); } } private : std::mutex mutex_; std::condition_variable cv_; int count_; };
2.3 不要用读写锁和信号量
最好不要使用读写锁,因为:
可能会在持有 read lock 的时候修改了共享数据,此时和无 mutex
并发读写共享数据是一样的。
读写锁不见得比互斥锁开销小,read lock 还需要额外更新当前 reader
的数目。如果临界区足够小,mutex 往往会更快。
read lock 可能允许提升未 write
lock,也可能不允许提升。但最好不要这么做,如果多个 read lock
尝试提升,会造成和可重入锁一样的问题,堆栈难以查明问题。
追求低延时读取的场景也不适合用读写锁。
如果遇到并发读写,可以考虑 copy-on-write,同时避免 reader 被 writer
阻塞。
作者表明,他还没有遇到过需要使用信号量的场景 ,使用条件变量配合
mutex
完全可以替代它的功能,而且更不容易出错。信号量的另一个问题在于它也有自己的计数值,通常我们自己的数据结构也有自己的长度值,这就造成了同样的信息存了两份,需要时刻保持一致,额外增加了程序员的负担。如果要控制并发读,可以考虑用线程池 。
2.4 使用
Pthread 封装 MutexLock、MutexLockGuard、Condition
MutexLock 默认创建 PTHREAD_MUTEX_DEFAULT
类型,预想的应该是 PTHREAD_MUTEX_NORMAL
类型。严格做法应该是传入 mutexattr 参数来显示指定 mutex
类型。
这段代码也没有检查 pthread
调用的返回值。检查返回值的意义是防止 ENOMEM
之类的资源不足的情况,只有在负载很重的应用中才会出现。
1
2
3
4
5
6
7
8
9
10
11
12
13
14
15
16
17
18
19
20
21
22
23
24
25
26
27
28
29
30
31
32
33
34
35
36
37
38
39
40
class MutexLock : boost::noncopyable { public : MutexLock () : holder_ (0 ) { pthread_mutex_init (&mutex_, NULL ); } ~MutexLock () { assert (holder_ == 0 ); pthread_mutex_destroy (&mutex_); } bool isLockedByThisThread () const return holder_ == pthread_self (); } void assertLocked () const assert (isLockedByThisThread ()); } void lock () pthread_mutex_lock (&mutex_); holder_ = pthread_self (); } void unlock () holder_ = 0 ; pthread_mutex_unlock (&mutex_); } pthread_mutex_t * getPthreadMutex () return &mutex_; } private : pthread_mutex_t mutex_; pid_t holder_; };
MutexLockGuard
最后一行的定义的宏,是防止出现这样的语句:MutexLockGuard(mutex);。遗漏的变量名,产生一个临时对象后立马被销毁了,没有做到保护临界区的作用。
1
2
3
4
5
6
7
8
9
10
11
12
13
14
15
class MutexLockGuard : boost::noncopyable { public : explicit MutexLockGuard (MutexLock& mutex) : mutex_(mutex) { mutex_.lock (); } ~MutexLockGuard () { mutex_.unlock (); } private : MutexLock& mutex_; }; #define MutexLockGuard(x) static_assert(false, "missing mutex guard var name" )
Pthread 的 condition variable 允许在 wait() 的时候指定
mutex。标准库中的 condition_variable 可以在
wait() 的时候指定 mutex。书中指出想不到 condition variable
会和不同 mutex 配合使用的场景,所以 muduo 实现时从简设计。
1
2
3
4
5
6
7
8
9
10
11
12
13
14
15
16
17
18
19
20
21
22
23
24
25
26
class Condition : boost::noncopyable { public : explicit Condition (MutexLock& mutex) : mutex_(mutex) { pthread_cond_init (&pcond_, NULL ); } ~Condition () { pthread_cond_destroy (&pcond_); } void wait () pthread_cond_wait (&pcond_, mutex_.getPthreadMutex ()); } void notify () pthread_cond_signal (&pcond_); } void notifyAll () pthread_cond_broadcast (&pcond_); } private : MutexLock& mutex_; pthread_cond_t pcond_; };
如果一个 class 要包含 MutexLock 和 Condition,请注意声明顺序
MutexLock 必须在前:
1
2
3
4
5
6
7
8
9
10
11
12
13
14
15
16
17
18
19
20
21
22
class CountDownLatch { public : explicit CountDownLatch (int count) : count_(count), mutex_(), condition_(mutex_) { } void wait () MutexLockGuard lock (mutex_) ; while (count_ > 0 ) { condition_.wait (); } } void countDown () } private : mutable MutexLock mutex_; Condition condition_; int count_; };
2.5 使用
pthread_once 实现线程安全的 Singleton
1
2
3
4
5
6
7
8
9
10
11
12
13
14
15
16
17
18
19
20
21
22
23
24
25
template <typename T>class Singleton : boost::noncopyable { public : static T& instance () pthread_once (&ponce_, &Singleton::init); return *value_; } private : Singleton () {} ~Singleton () {} static void init () value_ = new T (); } static pthread_once_t ponce_; static T* value_; }; template <typename T>pthread_once_t Singleton<T>::ponce_ = PTHREAD_ONCE_INIT;template <typename T>T* Singleton<T>::value_ = nullptr ;
使用方式也非常简单,但目前仅支持默认构造函数。如果需要指定构造方式,还需要额外的封装。
1 Foo& foo = Singleton<Foo>::instance ();
当然用 std::call_once 也可以:
1
2
3
4
5
6
7
8
9
10
11
12
13
14
15
16
17
18
19
20
21
22
23
24
25
template <typename T>class Singleton : boost::noncopyable { public : static T& instance () std::call_once (init_flag_, &Singleton::init); return *instance_; } private : Singleton () {} ~Singleton () {} static void init () instance_ = std::unique_ptr <T>(new T ()); } static std::once_flag init_flag_; static std::unique_ptr<T> instance_; }; template <typename T>std::once_flag Singleton<T>::init_flag_ = std::once_flag{}; template <typename T>std::unique_ptr<T> Singleton<T>::instance_ = nullptr ;
2.6 sleep()
只应该出现在测试代码中
它不具备 memory barrier
语意,不保证内存的可见性。它应该只出现在测试代码中,加速复现死锁的情况。如果线程需要等待某个事件发生,应该采用条件变量或
IO 事件回调。采用 sleep 轮询浪费了 CPU 资源。
2.7 借用 shared_ptr 实现
copy-on-write
下面的代码中,我们做到了:
read 不阻塞 read。
read 不阻塞 write。
write 不阻塞 read。
write 阻塞 write。
1
2
3
4
5
6
7
8
9
10
11
12
13
14
15
16
17
18
19
20
21
22
23
24
25
26
27
28
29
std::mutex mutex; std::shared_ptr<std::vector<Foo>> g_foos; void traverse () std::shared_ptr<std::vector<Foo>> local_foos; { std::lock_guard<std::mutex> lock (mutex) ; local_foos = g_foos; assert (!g_foos.unique ()); } for (auto it = local_foos->begin (); it != local_foos->end (); ++it) { it->doit (); } } void post (const Foo& foo) std::lock_guard<std::mutex> lock (mutex) ; if (!g_foos.unique ()) { g_foos.reset (new std::vector <Foo>(*g_foos)); } assert (g_foos.unique ()); g_foos->push_back (foo); }
错误 1 :直接修改 g_foos 指向的
shared_ptr。这段代码只阻止了 read 拷贝指针,没有阻止 read
读,会留下 shared_ptr 同时读写的隐患。
1
2
3
4
void post (const Foo& foo) std::lock_guard<std::mutex> lock (mutex) ; g_foos->push_back (foo); }
错误 2 :试图缩小临界区,把 copy
移出临界区。这段代码在多次 write 并发时,可能只有一次 write 生效。
1
2
3
4
5
6
7
void post (const Foo& foo) std::shared_ptr<std::vector<Foo>> new_foos (new std::vector <Foo>(*g_foos)); new_foos->push_back (foo); std::lock_guard<std::mutex> lock (mutex) ; g_foos = new_foos; }
错误 3 :把临界区拆成两个小的,把 copy
放到临界区之外。这段代码和上面一样,多次 write 并发时,可能只有一次
write 生效。
1
2
3
4
5
6
7
8
9
10
11
void post (const Foo& foo) std::shared_ptr<std::vector<Foo>> old_foos; { std::lock_guard<std::mutex> lock (mutex) ; old_foos = g_foos; } old_foos->push_back (foo); std::lock_guard<std::mutex> lock (mutex) ; g_foos = old_foos; }
通过 copy-on-write,我们完全不需要读写锁,仅需要
mutex 。对于 2.1.2 中的死锁问题,使用这种 copy-on-write
办法,非常简单就解决了。